If you’re a dedicated CS fan, you likely understand the significance of the 4:3 stretched resolution in enhancing your gameplay experience.
With CS2, achieving this aspect ratio has become challenging, but fear not! In this guide, we’ll walk you through playing CS2 at 4:3 stretched without those pesky black bars.

CS2: Playing 4:3 Stretched Without Black Bars
This comprehensive guide provides step-by-step instructions for CS2 players to achieve the coveted 4:3 stretched resolution without black bars. Starting with in-game settings adjustments, the guide walks NVIDIA graphics card users through specific desktop scaling configurations.
My Setup:
- MSI G241 Monitor (Secondary)
- Odyssey G7 2K (Primary)
I used the same method to make my Odyssey G7 run CS2 on a resolution of 1280×1024 without black bars.
Additionally, it covers customizing desktop resolutions to match CS2 preferences. The guide empowers gamers to enhance their CS2 experience, offering flexibility and clarity tailored to individual setups.
Setting Up CS2 for 4:3 Stretched Resolution
Before delving into the main steps, ensure your game is in Fullscreen mode by accessing the settings menu. Click on “Video” and navigate to “Display Mode.” If it’s set to Fullscreen Windowed mode, switch it to Fullscreen. This action unlocks the necessary video controls.
Next, click “Aspect Ratio” and select 4:3. Choose the resolution that suits your preferences. A popular choice is 1280×1024, but adjust this based on your monitor’s native resolution. Experiment a bit to find the perfect balance for your setup. After selecting your preferred settings, click “Apply Changes.”
Eliminating Black Bars with NVIDIA Graphics Cards
If you still see black bars after applying the in-game settings, NVIDIA graphics card users can follow these steps to enable stretched resolution:
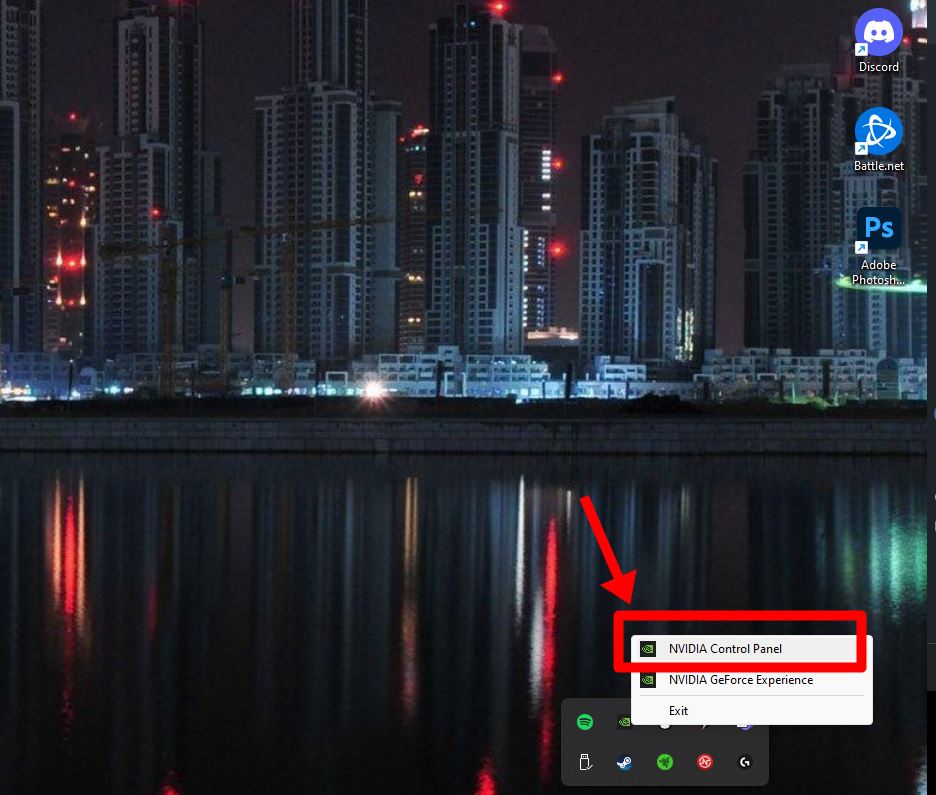
- Right-click on your desktop and open the “NVIDIA Control Panel.”
- If you have Windows 11, find the NVIDIA Icon in the bottom-right, right-click on it, and click on “NVIDIA Control Panel.
- Navigate to the “Display” tab and click on “Adjust Desktop size and position.”
- You would want to select the screen you like to run CS2 on. This applies to only Multiple display users.
- Under “Scaling,” choose “Full Screen” and click “Apply” to remove the black bars.
- If the issue persists, select “scale for GPU or Display” and attempt the process again.
Customizing Desktop Resolution for CS2
For further customization, you can set your desktop resolution to match your CS2 preferences:
- Go to “Change Resolution” under the “Display” tab in the NVIDIA Control Panel.
- Click “Customize” and enable “Enable Custom Resolutions not exposed by the Display.”
- Create a custom resolution by inputting your preferred values. Make sure you have your native resolution as a reference.
- Ensure the Hertz output matches your display capabilities.
- Test the resolution and click “OK” to save the settings.
- Select your custom resolution from the drop-down menu in the main prompt and click “Apply.”
Conclusion
Following these steps, you can enjoy CS2 at 4:3 stretched without black bars, enhancing your gaming experience. Remember, every setup is different, so feel free to experiment with resolutions until you find what works best for you.
Stay connected with Gamer Tag Zero for more insightful guides and tips related to CS2 and other gaming adventures. If you found this guide helpful, please share your thoughts in the comments below. Happy gaming!
Last Updated on October 4, 2023

An avid listener of music from a number of countries. Writing is his hobby and passion. A follower of all the latest android and PC games. Not to mention his favorite: Mobile Legends!