Once you’ve gained access to the Autocannon, the question arises: why opt for the Anti-Materiel Rifle? This guide explores the continued viability and, perhaps more crucially, the enjoyment factor of utilizing both weapons.
Table of Contents
ToggleAutocannon and Anti-Materiel Rifle Compared in Helldivers 2

As Long-Range Weapons
Why bother considering both? They essentially serve as long-range support weaponry!
The Anti-Materiel Rifle (AMR), likely one of your initial forays into support arms, excels in long-range, semi-automatic firepower with potent damage.
It particularly shines in dispatching specialized units, courtesy of its remarkable medium-penetration ammunition, surpassing standard small-arms fire.
Equipped with a 7-round magazine and an initial 6 spare magazines (boosted with the Donation Access License ship upgrade), it provides ample ammunition for crucial targets.
However, its suitability against larger swarms is limited, and the absence of an aiming reticle makes it most effective in the First-Person Field of View.
Considering all scope ranges, it becomes apparent that the AMR thrives when maintaining a considerable distance from adversaries, efficiently dealing with potential threats before they encroach.
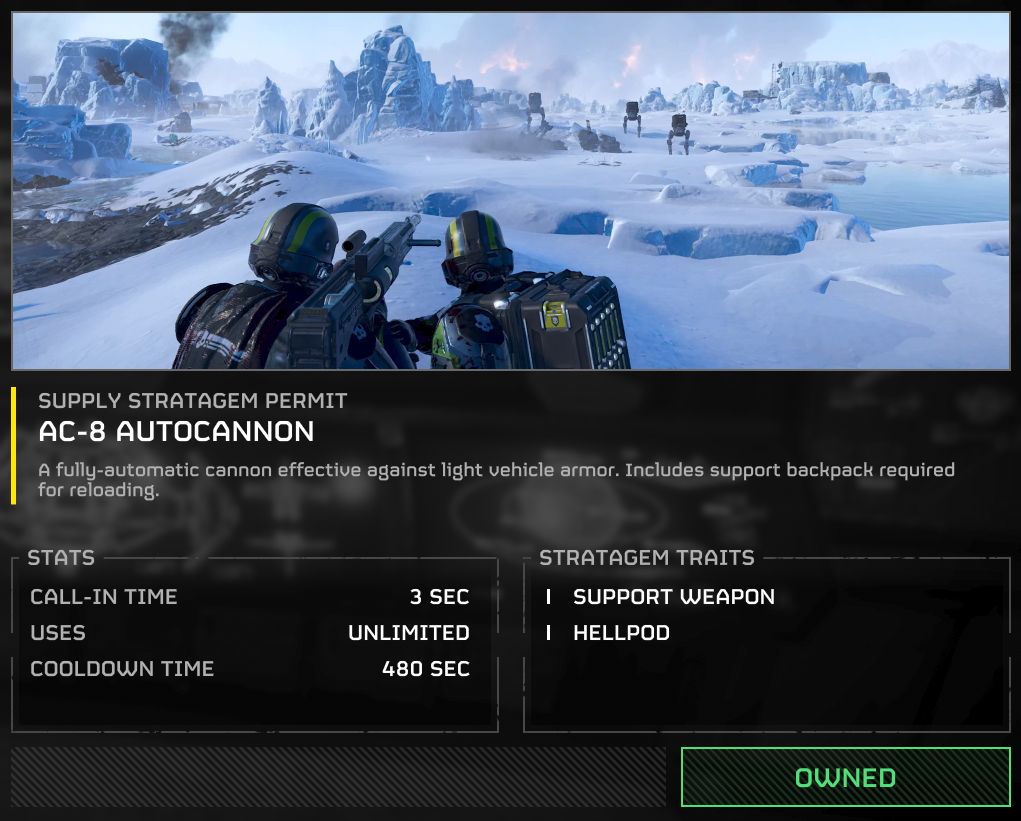
In contrast, the Autocannon operates as a mid-range, high-damage semi-auto/full auto support weapon, specializing in eliminating designated targets through its potent explosive ammo, surpassing conventional small arms fire.
Sporting an internal capacity of 10 rounds loaded in 5-round stripper clips, along with 10 extra clips in the backpack (total ammo at 10/50), the Autocannon offers substantial firepower, especially in the face of closely packed enemy hordes.
However, the need for reloading, either manually or with the assistance of a fellow diver carrying the user’s backpack, poses challenges when confronted by multiple adversaries simultaneously.
With firing modes tailored for certain armor types, the Autocannon can unleash a barrage of liber-tea on high-value targets, both rapidly and over extended distances.
Ammo & Targets
However, despite their apparent similarities in catering to longer ranges, the Anti-Material Rifle (AMR) and the Autocannon diverge in two critical aspects: their ammunition and intended targets.
The AMR utilizes medium-penetrating ammo, while the Autocannon employs explosive ammunition. Although both can effectively eliminate similar targets, certain specialized units may compel users to expend more ammunition with one weapon compared to the other.
Concerning Bugs:
Both the AMR and the Autocannon excel in dispatching most bug threats, particularly the Hive Guards, whose formidable front plates pose a significant challenge at higher difficulty levels. Neglecting to eliminate these threats promptly could lead to a bug breach, an undemocratic outcome indeed.
Engaging bugs like Guards and Brood Commanders from a distance distinguishes these weapons, preventing the party from being impeded by additional hordes en route to the objective.
Notably, the Autocannon shines in tackling Chargers due to its explosive ammo, circumventing the 10% total damage reduction to weak spots inherent in regular ammo. While the AMR remains potent, the Autocannon can dispatch a Charger, starting from full health, with five shots to the posterior, inducing a bleed-out.
An alternative method exists, but personal testing reveals its inconsistency, risking wasted ammo and time when compared to the more straightforward approach mentioned earlier.
For Bots:
The AMR proves effective against key units that pose imminent threats to the player or fellow divers from a respectable distance, with headshots reliably neutralizing Rocket and Gunner Devastators, the primary forces capable of swiftly eliminating a helldiver.
This particular adversary harbors a strong disdain for freedom!
The rifle also demonstrates proficiency in taking down Hulks with two well-placed headshots, especially at greater distances. Moreover, it can inflict damage on Tanks, Turrets, and substantial gun batteries like AA Guns and Mortars by targeting their exhaust vents.
The Autocannon shares a similar capability in eliminating Tanks, Turrets, and batteries with a more frugal use of ammo. However, it lacks the precision to dispatch Hulks with headshots, relying on their exposed backs for effectiveness.
Devastators require more ammunition to neutralize compared to the AMR. The one unit where the AMR faces a challenge is the Scout Striders, requiring three shots to breach the protective plate on the unit’s front, while the Autocannon achieves the same with just one shot.
Handling
The handling and ergonomics of the AMR may seem marginally better (or possibly worse, it’s challenging to discern) compared to the Autocannon. However, when faced with onrushing enemies such as Commanders, the most straightforward approach is to resort to hipfiring with the center of your screen aimed at the head.
Hipfiring the AMR proves handy in tight situations, though not every shot may find its mark. Conversely, it is advisable to refrain from hipfiring with the Autocannon, as the likelihood of missing or, worse yet, ricocheting rounds into friendly units is significant.

Final Words
In theory, the Autocannon may appear as the more optimal choice in various scenarios. However, the AMR’s ability to reload while on the move and keeping the backpack slot available for crucial stratagems like the Guard Dog Rover and the Jetpack provides it with a tactical advantage over the more offense-centric explosive cannon.
While the Autocannon may find more utility in bug missions, the AMR still plays a vital role within the team, compensating for crowd-clearing deficiencies with the aid of stratagems like the Gatling Turret and the notorious Cluster Bombs.
This underscores the importance of team composition and weapon selection, showcasing the viability of any build, weapon, or stratagem on a fundamental level.
The key takeaway from this guide is simple: play with the weapon that resonates with your preferences, but always bear in mind the collaborative nature of the game.
Striking a balance between armor-destroying weaponry and crowd-clearing abilities is the genuine secret to tackling even the formidable Helldive difficulties.
Resist the pressure from metaslaves dictating how you should play, yet maintain a cooperative spirit with your team.
Thank you for reading this guide! Even though I may not expect it to gain widespread recognition, I’ve invested over 200 hours into this game, and it’s steadily becoming one of my all-time favorites.
If this guide is well-received, I may consider creating more in the future, possibly delving into a comparison between the energy shield and the ballistic shield.
Last Updated on March 6, 2024

An avid listener of music from a number of countries. Writing is his hobby and passion. A follower of all the latest android and PC games. Not to mention his favorite: Mobile Legends!