
Want to play Palworld with your friends on a proper dedicated server without paying a monthly fee to GPORTAL, Nitrado, Shockbyte, or another game-server host? Good news: you can host one yourself.
And no, you don’t need to be a server expert.
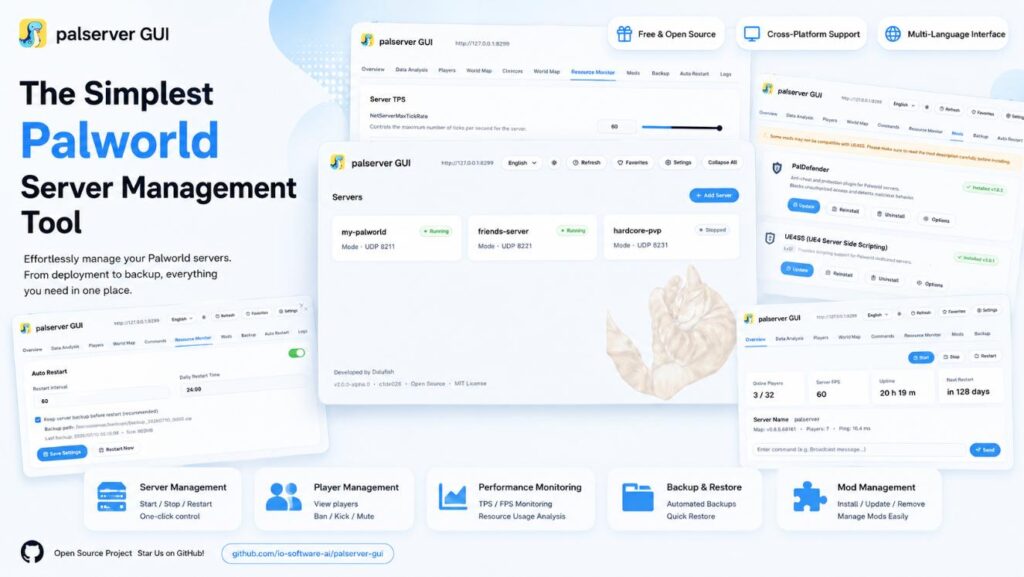
How to Host a Free Palworld Dedicated Server in Minutes – No SteamCMD or Port Forwarding
You don’t need to learn SteamCMD. You don’t need to spend an hour typing commands into a terminal. You don’t need to create batch files, manually edit complicated configuration files, or fight with your router trying to figure out port forwarding.
You can run a Palworld dedicated server on your own Windows PC using a simple, free, open-source tool called palserver GUI.
The whole process is designed to be simple:
- Download the tool → create your server → start it → give your friends an invite address → play.
For most people, you can go from downloading the software to having your friends online in roughly five minutes. This guide walks you through the entire process.
Why Host Your Own Palworld Server?
If you’ve been playing Palworld with friends, you’ve probably already run into the usual problem. Someone hosts a multiplayer world. That person has to be online for everyone else to play.
Then the host goes to sleep, goes to work, or simply doesn’t feel like playing—and the world disappears for everybody else. A dedicated server solves that problem.
A dedicated server keeps the world running independently of one particular player’s game session. Your friends can come and go, build their bases, catch Pals, explore the map, and continue progressing without waiting for the original host to launch the game.
The problem is that traditional dedicated-server tutorials often make the whole process look unnecessarily complicated.
You start reading instructions and suddenly you’re dealing with:
- SteamCMD
- command-line commands
- batch files
- server directories
- configuration files
- firewall rules
- router settings
- port forwarding
- IP addresses
- troubleshooting connection errors
At that point, many people simply give up and rent a server instead. That works—but it also means paying a monthly fee forever. Depending on the provider and server configuration, that can easily mean spending $10–20 every month just to keep a Palworld server running.
If you already have a Windows PC that can stay on while your friends play, there’s another option:
Host the server yourself.
And with palserver GUI, the process is much easier than the traditional method.
What You’ll Need
The requirements are surprisingly simple.
You need:
1. A Windows PC
This is the computer that will run the dedicated server.
It doesn’t have to be an incredibly powerful gaming PC. A dedicated Palworld server generally has less demanding graphics requirements than running the actual game yourself.
Of course, the exact performance you need depends on factors such as:
- How many players you have
- How large and active your world becomes
- How many mods you install
- How much RAM your PC has
- What else the computer is doing while the server runs
For a small group of friends, a reasonably modern Windows PC should generally be perfectly capable.
The important thing is that the PC can remain switched on whenever your friends want to access the server.
2. About five minutes
That’s pretty much it.
You do not need:
- A second copy of Palworld
- SteamCMD
- A Linux server
- Command-line experience
- Manual configuration-file editing
- Port forwarding
- A monthly server-hosting subscription
The goal here is to make the process as close to “install an app and click a few buttons” as possible.
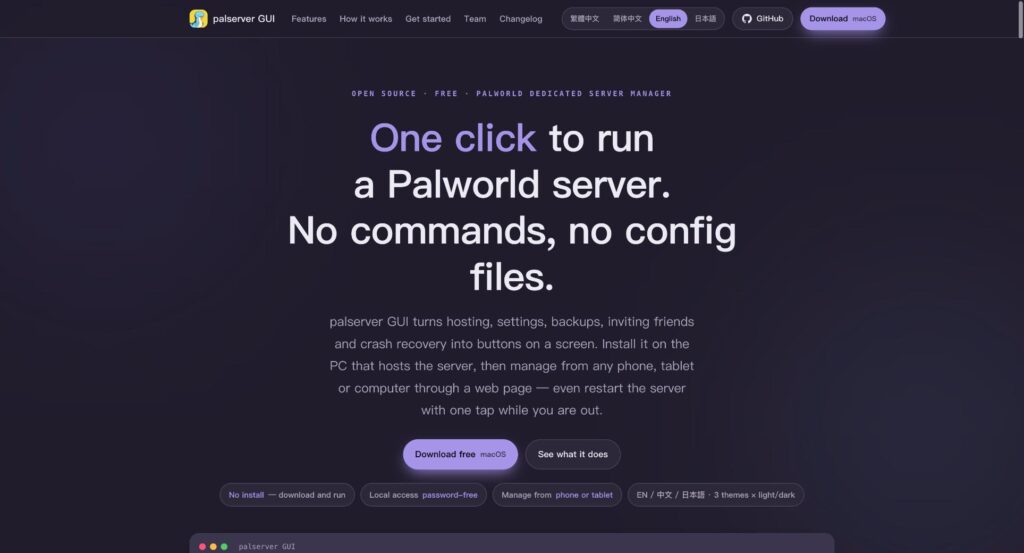
Step 1: Download and Install palserver GUI
Start by visiting the official palserver GUI website:
Download the application and run it.
If you’ve ever followed a traditional dedicated-server tutorial, this is where you’ll immediately notice the difference.
Instead of opening a command prompt and typing a series of commands, you’re working with a normal desktop application. No terminal window. No mysterious commands. No copy-pasting instructions from a tutorial and hoping you didn’t make a typo.
Just open the application and you’ll be greeted by a straightforward dashboard. “palserver GUI” is free and open-source, and its core features are designed to be available without a paid subscription.
Step 2: Create Your Palworld Server
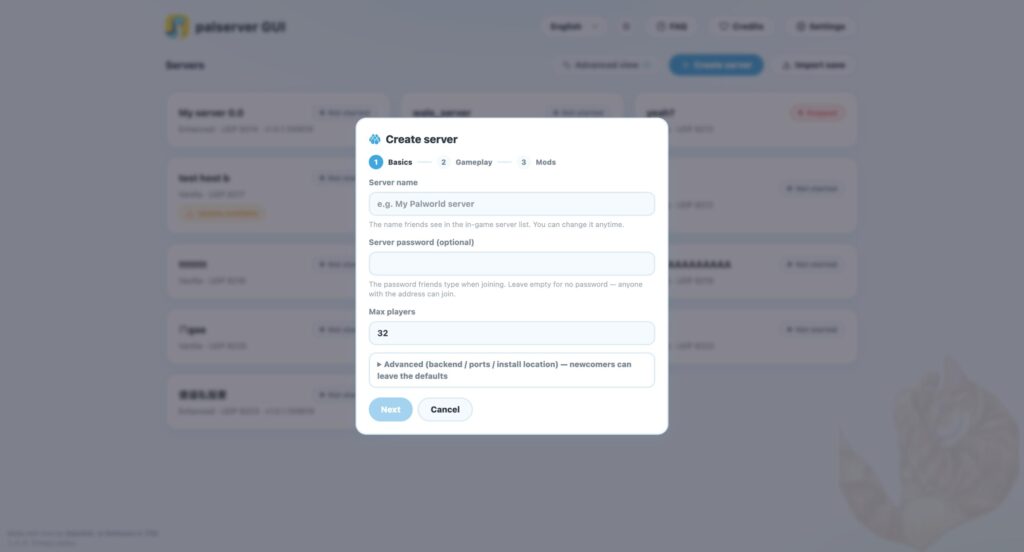
Once you’ve opened palserver GUI, look for the option to Create Server.
Click it and follow the setup wizard. This is where the tool takes care of the part that normally causes the most frustration: downloading and setting up the Palworld dedicated-server files.
Traditionally, this is where you would often need to install and configure SteamCMD manually. With palserver GUI, the process is automated.
The application handles the setup for you while you wait.
You can then configure the basic details of your server, such as:
- Your world name
- Basic gameplay settings
- Difficulty
- World options
- Other available server settings
If you don’t know what everything does, don’t worry. You can simply start with the default settings and change things later. That’s one of the advantages of using a graphical interface. You don’t need to understand every single setting before you can start playing.
Once you’ve completed the wizard, start the server. That’s it. You now have a running Palworld dedicated server. No command prompt. No SteamCMD. No manual compilation. No complicated setup process.
Step 3: Let Your Friends Join Without Port Forwarding
This is the step that causes the most problems for people trying to host game servers from home.
You have a server running perfectly. You can connect to it. Everything looks fine. Then your friend tries to join—and can’t. The problem is often your home network.
Traditional self-hosting frequently requires port forwarding. You have to log into your router, find the right settings, forward the correct ports, and then troubleshoot firewall or network issues if something still doesn’t work.
For many people, this is the point where the whole “free server” idea starts becoming a headache. palserver GUI provides built-in support for playit.gg, which is designed to help solve this problem.
Instead of manually configuring your router, you can use the connection helper to generate an address that your friends can use to connect to your server.
The basic process is:
1. Enable the connection helper
Turn on the relevant connection option inside the application.
2. Copy the invite address
The tool will provide an address that your friends can use.
3. Send the address to your friends
They can enter it through Palworld’s Join by IP option. And, assuming everything is configured correctly, they can connect to your server without you having to manually open ports on your router.
This is one of the biggest advantages of this setup. You get the benefits of hosting a server at home without having to become a network administrator first.
Step 4: Manage Your Server from a Simple Control Panel
Getting the server running is only half the story. The real advantage of using a dedicated server-management tool becomes obvious when you start managing the server over time.
Palworld receives updates. Your world changes. You may install mods. You may want to adjust the difficulty. Doing all of this manually can quickly become annoying.
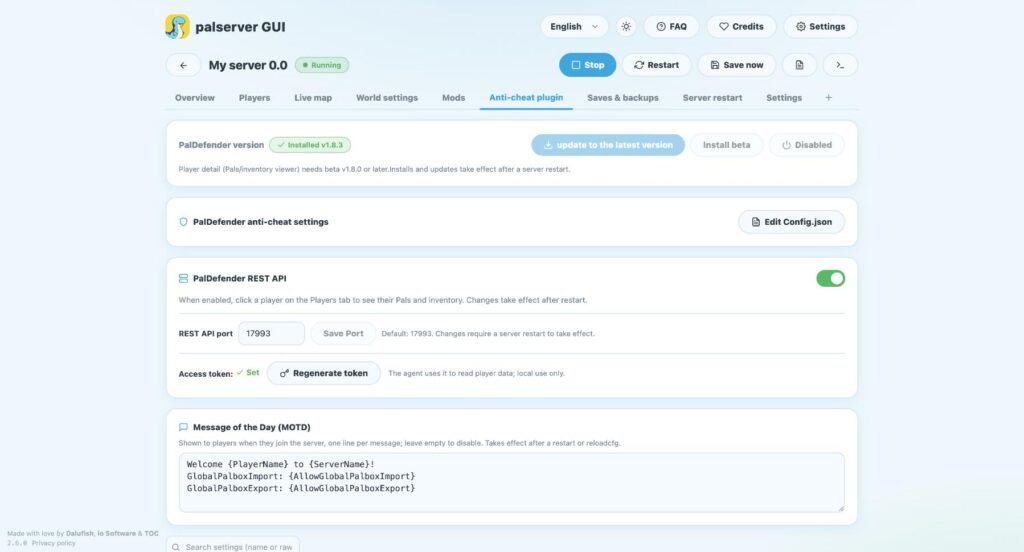
With palserver GUI, you have a central interface for managing your server.
Change Settings Without Manually Editing Configuration Files
Want to adjust your gameplay settings? Instead of hunting through configuration files and trying to figure out which line controls which setting, you can make changes through the interface.
Depending on the available options, you can adjust things such as:
- Difficulty
- Resource rates
- World settings
- Gameplay options
- Engine-related settings
This is much more approachable if you aren’t comfortable manually editing .ini files.
Manage Mods More Safely
Mods can make Palworld even more interesting. They can also occasionally cause problems. A mod might conflict with another mod. An update might break compatibility. Your server might stop starting correctly after a game patch.
When that happens, you don’t necessarily want to delete the mod forever. A proper server-management interface can make it easier to enable and disable mods as needed. If something breaks, you can switch a mod off, test the server, and troubleshoot the problem without permanently deleting everything.
That makes experimenting with mods much less stressful.
Keep Backups of Your World
Your Palworld world represents potentially dozens or hundreds of hours of progress. The last thing you want is to lose everything because of a corrupted save, a bad update, a broken mod, or an accidental mistake.
Backups are therefore extremely important. A good server-management setup allows you to keep backups of your save data so that you have something to restore if something goes wrong. Even if you never need a backup, having one can save you from a huge amount of frustration later.
A simple rule is:
If you care about your world, back it up.
What Happens When Palworld Gets an Update?
Game updates can sometimes be a headache for dedicated servers. This becomes even more complicated when you’re running mods.
A new Palworld update might:
- Change server files
- Break mod compatibility
- Cause an existing server configuration to behave differently
- Prevent certain mods from working
- Cause the server to stop starting correctly
This is why blindly updating everything the moment a new patch appears isn’t always the best idea. A server-management tool can make this process easier by helping you identify when a new version is available and manage updates more carefully.
That can help you avoid the classic situation where:
“The game updated and now the server won’t start.”
If you have a heavily modded server, it’s especially important to think about updates before immediately installing them.
Can You Run Multiple Servers?
If you eventually decide to run more than one Palworld server, a graphical server-management tool can also make that easier.
For example, you might eventually want:
- A regular survival server
- A heavily modded server
- A testing server
- A separate world for a different group of friends
Managing several servers manually can become messy very quickly. Having everything organized in one interface makes it easier to manage different worlds and configurations.
The tool also includes remote-management capabilities for users who eventually grow beyond a simple one-server setup.
What About Language Support?
palserver GUI is not limited to English.
The application is available in:
- English
- 日本語
- 繁體中文
- 简体中文
That makes it more accessible to players and server administrators around the world.
Should You Just Rent a Server Instead?
Honestly, renting a server isn’t a bad option.
Services such as GPORTAL, Nitrado, and Shockbyte exist for a reason.
If you don’t want your own computer involved at all, renting can be convenient.
You pay a monthly fee, choose your server, and let the hosting company handle the hardware.
For some people, that’s exactly what they want.
But self-hosting has some significant advantages.
Self-hosting means no monthly server bill
Once you have the necessary hardware, you don’t have to keep paying a monthly subscription just to keep your world available. That’s the biggest advantage for many groups.
Over a year, the cost of a rented server can add up significantly. With a self-hosted server, you’re using your own hardware instead.
You have more control
When you host the server yourself, you have much more control over:
- Your save files
- Your mods
- Your settings
- Your backups
- Your server configuration
You aren’t dependent on a hosting company deciding what features are available.
You can still get a simple interface
The traditional argument against self-hosting is that it is complicated.
That argument made more sense when the only option was to install server software manually and spend an afternoon working through command-line instructions.
A graphical tool changes that equation.
You can get many of the conveniences associated with paid server panels without paying a monthly hosting bill.
The One Major Disadvantage of Self-Hosting
There is one important catch. Your computer needs to be running for the server to be available. If you shut down your PC, your friends can’t connect to the server. That’s the main advantage rented servers have.
A rented server is designed to run continuously in a data center. Your own PC, on the other hand, has to remain switched on. But if you already leave your computer on most evenings – or if your group generally plays during predictable hours—this may not be a major problem.
For many small groups of friends, the savings and extra control make self-hosting worthwhile.
Frequently Asked Questions
Do I need to buy Palworld twice?
No second copy is required for the dedicated server itself.
Your friends still need their own copies of the game to play, of course, but you don’t need to purchase an additional copy simply to run the server.
Do I need SteamCMD?
No.
The whole point of using palserver GUI is to avoid the traditional SteamCMD-based setup process.
Do I need to use the command line?
No.
The tool is designed to provide a graphical interface for the setup and management process.
Do I need to configure port forwarding?
The built-in playit.gg support is designed to let your friends connect without requiring you to manually configure port forwarding on your router.
Can I install mods?
Yes. The server-management interface includes tools for managing mods, including enabling and disabling them when necessary.
What happens if a mod breaks the server?
You can disable problematic mods and troubleshoot the server without necessarily deleting them permanently.
Should I back up my save?
Absolutely.
Your world can represent a huge amount of time and progress. Regular backups are one of the most important things you can do when running any dedicated game server.
Final Thoughts
Running your own Palworld dedicated server doesn’t have to be a complicated technical project.
The traditional approach can certainly work, but many players don’t want to spend their evening learning command-line tools, configuring SteamCMD, editing configuration files, and wrestling with their router.
That’s where a graphical server-management tool can make a big difference.
With palserver GUI, the basic process is straightforward:
- Download the application.
- Create your server.
- Let the tool handle the setup.
- Start the server.
- Enable the connection helper.
- Send your friends the invite address.
- Start playing.
You get an always-available world for your group without paying a monthly hosting fee.
The main trade-off is simple: your computer needs to stay on whenever you want the server to be available.
If that works for your group, self-hosting can be a great alternative to renting a server.
Useful Links
Download palserver GUI:
Source code:
You can also find community support and Discord links through the official website. If this guide helped you get your friends online, consider supporting by sharing the guide with other Palworld players who are tired of paying monthly server fees. Have fun – and good luck building your world.
Last Updated on July 31, 2026

An avid listener of music from a number of countries. Writing is his hobby and passion. A follower of all the latest android and PC games. Not to mention his favorite: Mobile Legends!