In this post, I am going to be talking about various performance fixes for the game Dying Light 2: Stay Human. These are the most common issues faced by players worldwide. I am sure that after reading the full guide you will be able to troubleshoot most problems faced while running the game, so do have a look.

Performance Issues and Fixes In Dying Light 2 Stay Human
How to set a larger FOV

This short tutorial will show you how to set a larger Field Of View (FOV) in Dying Light 2. Open Dying Light 2’s video configuration file in a text editor.
Make sure the game is closed before proceeding. You can do so by pressing Win + R (to open the run command box) and entering the following command and press Enter:
notepad %USERPROFILE%\Documents\dying light 2\out\settings\video.scr
Set a larger FOV
Edit the value ExtraGameFov(20.00) with the desired FOV; eg. ExtraGameFov(50.00). Now, save the file by pressing Ctrl + S and it’s done. You can now launch your game and enjoy your new Field Of View.
Disable Motion Blur
Edit the value MotionBlur(1) to MotionBlur(0). Now, save the file by pressing Ctrl + S and it’s done. You can now launch your game and enjoy it without Motion Blur.
Note:
This method will not trigger any anti-cheats or VAC; it’s safe to play online with this method. I disabled blur while I was at it too because motion blur is the worst thing they ever added to games, aside from maybe chromatic aberration, and film grain. Actually, it’s worse than film grain too.
My file didn’t even have the extragamefov line, although that may be because I hadn’t entered the actual game beyond the main menu, due to checking the forums to see if anyone else was unable to bind mouse keys (there are definitely people complaining about it, for good reason).
You can turn everything off you don’t want in the in-game advanced settings, including changing FOV up to 120.
60FPS with RTX Ultra 1440p – RTX 3080 Settings
This is designed for those using an RTX 3080 card. For anyone trying to configure their settings to get 60 fps 1440p with Ray tracing ultra, here is what I am using which has set me at a comfy 60+ fps wherever I go so far.
So far it has generally been between 85-100 fps in most places, but there are places e.g. dense forests where it can drop hard. But with these settings has stayed over 60 for me.
My Video Settings
- DLSS Balanced
- D3D12 Ultra (required for raytracing to work)
- Antialiasing High
- Particle Quality High
- Sun shadows – Raytraced soft shadows
- Contact shadows – Very high
- Ambient Occlusion – Ultra quality raytracing
- Global Illumination – Ultra quality raytracing
- Reflections quality – Ultra quality raytracing
- Raytraced flashlight enabled
- Fog quality Medium
These settings have worked for me, I have put my specs below:
- RTX 3080
- Ryzen 3900x
- 32GB RAM
English audio, language text others
If you need to separate the text language from the audio language it is really quite simple. Go to the folder: Dying Light 2 -> ph -> work -> data_lang.
You should have 2 folders here: 1. speech_en & 2. (your language, for example, Polish) speech_pl. Delete speech_pl and now you have English audio and Polish text.
How to skip the intro?
Start game with Parameter: -nologos. Skipping the introduction when you launch the game by simply adding this command to your launch options : -nologos (Steam >> Right-click on Dying Light 2 >> Properties).
Best FPS for low-end PC’s
In this guide, I’m going to show you how to optimize Dying Light 2 for a better low-end experience. To begin, you will need Visual Studio Code and obviously an Official copy of Dying Light 2. I’m using some of these settings with a 1050Ti.
EDIT VIDEO FILE
We’re going to edit the “video.src” file, which is the configuration file. The file is located there : E:\Programmes\Documents\dying light 2\out\settings.
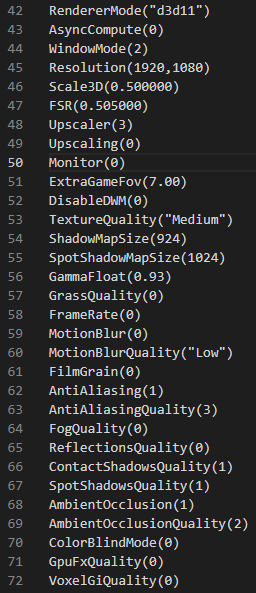
You’ll find a file named “video.src” and you’re going to type “Visual Studio Code” in the Windows taskbar, open it. Click on “Files” and “Open the file…”. We’re going to search these settings :
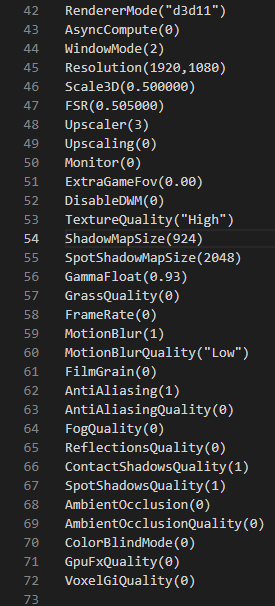
And you can change everything you want, I recommend this config :
How to set your server Private
This server helps you from keeping any outsiders away from your server. Because the server list is already flooded with servers that you mostly cannot get into because of the connection issues at the moment, so it might be a good thing to just have your server private to save some space.
So first you go to your Online Menu in your pause screen and click it. You go to your Online Options. It’s inside the red square. You scroll the first selection until you find “Private”. I’ll give you these few terms:
- “Friends Only” = Only the host’s friends can join.
- “Single Player” = Host is on his/her/its own and no one can join.
- “Public” = Any random person can join without the host’s permission.
- “Private” = Only the player that the host invited can join the game.
Enjoy the outsider-free experience and please stop cluttering the server browser. Techland already has issues with its servers so you’d be doing a favor to them and players who want to hang out.
Disable AntiAliasing (Similar to disabling DOF)
This game has an Anti-Aliasing filter that creates a false sensation of the depth of field. To deactivate Anti-Aliasing completely, the following steps must be followed:
- Close the game.
- Enter the following route “C:\Users\ ((THE USERNAME YOU HAVE IN WINDOWS)) \Documents\Dying Light 2\Out\Settings”.
- Right-click on the “VIDEO.SCR” file and select open with a text editor such as Notepad++.
- We look for the line “Anti-Aliasing(1)” and “Anti-Aliasing Quality(1)”.
- Change the value to “Anti-Aliasing(0)” and “Anti-Aliasing Quality(0)”.
- Then save the file and we can open the game.
- At the moment it is NOT necessary to change the permissions of the file “video.scr” to “Only Read”. But maybe it is necessary at some time to maintain the configuration.
Proper HUD customization guide
You can either disable all the HUD or just some of the elements by tweaking 1 of the game’s files. Here are the steps:
- First of all, you should close the game and install 7zip to open compressed files and a text editor like notepad++.
- Navigate to your game folder by right-clicking your game in the library and selecting Manage->Browse local files. You can also go to C:\Program Files (x86)\Steam\steamapps\common\Dying Light 2\.
- Go inside the ph folder, then inside the source folder. You will be in C:\Program Files (x86)\Steam\steamapps\common\Dying Light 2\ph\source and there’s a file called “data0.pak” there.
- Open the file with 7zip, WinRAR, or whatever you use. And then go inside the “gui” folder. Extract the “hud_config.scr” file (MAKE A BACKUP TOO!).
- Open the extracted file with notepad++. And then you just need to edit some lines to disable stuff.
- After making the changes, delete the “hud_config.scr” file inside the guide folder in “data0.pak” and move your own inside. You could also move and replace. (BACK UP THE ORIGINAL FILE BEFORE!)
How to disable the compass:
Scroll to the “DisplayList(“hud_screen_layer_radar”)” line. Remove the lines inside the brackets. Test in game with radar ON vs OFF.
For some unknown reason, many developers have a tendency to create beautiful worlds and then fill the screen with crap so you can’t appreciate their craft.
I’ve seen indie games with more HUD customization than this, and this game with just 5 on/off toggles is laughable, even the subtitles have more settings.
Best settings for older graphics cards (GTX 1060, RX 580, and others)
Video
Upscaler Mode: FSR, performance
Advanced Video Settings
- Accessed by pressing F in Video.
- Asynchronous Compute: On (May need to change Renderer Mode to D3D12)
- Antialiasing Quality: High
- Motion Blur Quality: Low
- Particles Quality: Low
- Contact Shadows Quality: None
- Ambient Occlusion Quality: Low
- Global Illumination Quality: Low
- Reflections Quality: Low
- Fog Quality: Low
I hope these settings helped you.
I really hope that my fixes work out for you. Leave a comment to let me know your feedback. You can follow us on Twitter and drop a like on Facebook to get the latest update on guides for Mobile Games, PC Games, Fixes, and Settings.
I also have a YouTube channel where I upload the latest gaming content for PC and Android. Feel free to check that out at your own leisure. Got specific suggestions? You can submit them here. Thanks for reading!
Last Updated on November 5, 2024

An avid listener of music from a number of countries. Writing is his hobby and passion. A follower of all the latest android and PC games. Not to mention his favorite: Mobile Legends!