The latest edition of Vampire: The Masquerade has been all the rage in recent times. Titled Swansong, it has some incredible characters and even crazier endings for them.
However, before we get there, a lot of puzzles and mysteries await us. They are more refined than what players got in Bloodhunt, and are challenging to the bone. One of the most complex ones among them is the “Oedipus Puzzle.”
Read also: The full quests guide for season one of Vampire: The Masquerade-Bloodhunt
It falls in the journey of Leysha, who is visiting the Red Salon to meet Richard. Here, she will have to navigate the offices and puzzles in order to fully solve the looming mystery.
It can provide quite a task for players to understand just how to solve the puzzle box and win the mission. The following guide will help you through all the tricky bits in getting past the Oedipus Puzzle.

Vampire: The Masquerade-Swansong: Steps to solve Oedipus Puzzle
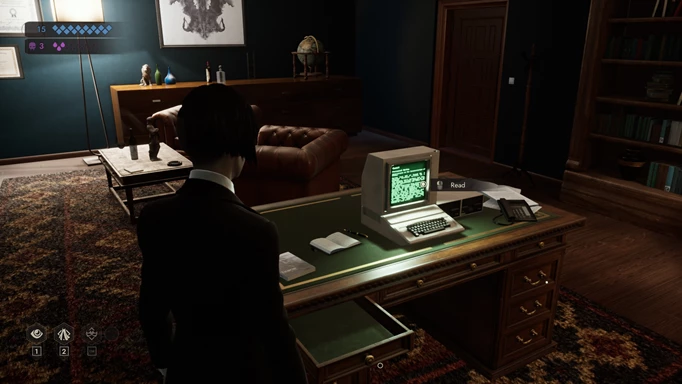
Leysha will start her quest from her office of Richard. You will notice a computer on his desk, with a file open. It is titled, “Observations on The Interpretation of Dreams.”
Make sure to read the subsequent paragraphs carefully, as they have some clues hidden in them. Richard is urging you (Leysha) to start looking up Volume 5 of Freud.
Therefore, go over to the bookshelf in the waiting room and take the books in a particular order of V, III, and IV. This is the gateway to unveiling the Oedipus Puzzle.
Leysha has the knowledge required, but it can be overwhelming to know how to begin. You start by observing the Oedipus-themed paintings hanging on the wall.
It is in the order of numbers 2, 4, 3, and 1. The writing on number 2, “Oedipus pointing to the object of shame,” is particularly interesting. All of the paintings have Oedipus either pointing or looking, except number 4.
That painting is the mirrored version of The Plague of Thebes, by Jalabert. Therefore, Antigone should be the subject of your attention, not Oedipus. The order goes:
- Oedipus pointing left
- Oedipus pointing lower left
- Oedipus staring below
- Antigone staring lower right
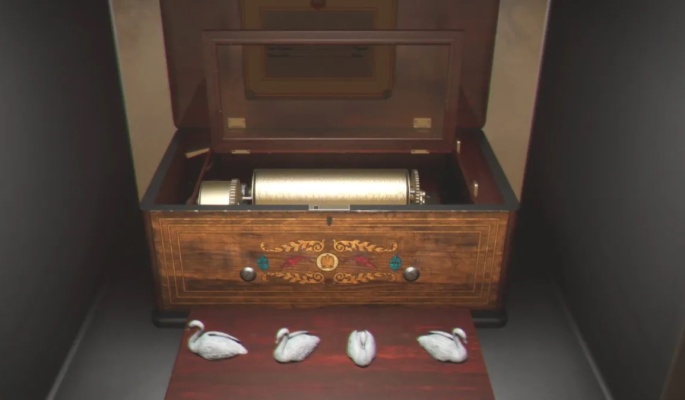
Once you have this order settled, go back to the mystery box (music box), and configure the swans as ←, ⇙, ↓, ⇲. Thus, you have solved the puzzle and will gain entry to the room behind it. However, once you pass into the next scene, you cannot come back, so be certain that all pending work is done in the Red Salon.
The whole scene has a healthy amount of foreshadowing, which can bring flashbacks of searching Hazel’s room as Emem or having ready Antigone’s play. Moreover, figuring out the Oedipus puzzle helps you move on to the final section of Leysha’s scene in the Red Salon mission.
Last Updated on May 23, 2022

A FIFA junkie who can also mix it up with Call Of Duty and racing games. GTA was his first love. Now can be found spending time between writing on what he plays and playing what he will write on.